.webp?width=91&height=70&name=MCDLG%20Logo%20(Resize).webp)
.webp)
In this article, we discuss the various optional parts available for control dampers. Learn how to equip your dampers and make them work for you.
The decisions don't end when you choose the right control damper for your project. You need to consider the available options. Accessory parts like transition collars and actuators add versatility to your dampers.
There are also options involving the damper's construction, such as linkage location and blade orientation. Let's take a closer look at the accessories and options available for control dampers.
Transitions - Round, Oval, Square, and Rectangular
Transitions are attachments that fit around the face and rear of the damper, allowing the damper to be installed in duct work of a different shape. Transitions are installed at the factory. Technicians will affix the transition to the damper's face and apply caulk to the edges of the transition. This creates an airtight connection between damper and transition piece.
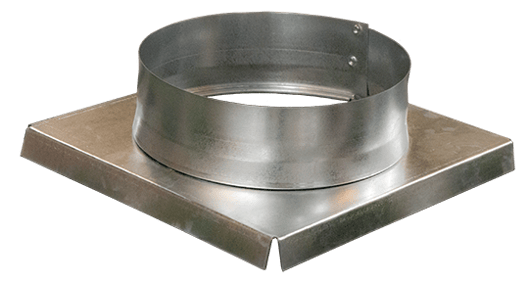 Transitions fit over the face and back of the damper to allow connections between ducts of a different shape, without compromising air performance.
You may find that a rectangular damper works best for a section of ductwork, but the duct in that area is circular. With a round transition, you can install the rectangular damper into the round ductwork. Transitions are available in round, oval, square, and rectangular shapes.
Starting a new project? Contact Air Balance about our line of control dampers. Let's work together to meet your requirements!

You will need to specify the dimensions of your ductwork when ordering a transition, to ensure the best possible fit. Read our article on damper dimensions for pointers on how to properly size your dampers: Damper Dimensions.
Choose a transition when you need your damper to match up with the shape of your ducts.
Linkage - Parallel or Opposed, In-jamb or On-Face
Linkage are the connecting parts that tie all blades in the damper to a single action. When an actuator rotates the driving blade axle, linkage will translate that rotation to all the blades in the damper. This synchronizes all blades with the driving blade, so that all blades open at the same time. Linkage is an integral part of every control damper.
When you choose a control damper with multiple blades, you will have the option to determine how the linkage is configured: whether it is in the jambs or on the face of the damper, and how the linkage will move the blades. This blade movement is referred to as blade orientation. Blades can have a parallel or an opposed orientation.
Check out our Newsstand article on blade orientation and how it affects the damper’s performance: Parallel or Opposed?
In short, blade orientation will determine how the damper closes and may affect air performance during closure. Parallel blades have a minimal effect on air flow, but opposed blades will have more torque applied to the blades when closed. Do you need a damper that tightly closes? Or should air performance be the primary focus? Choose the blade action that best fits the damper’s intended application.
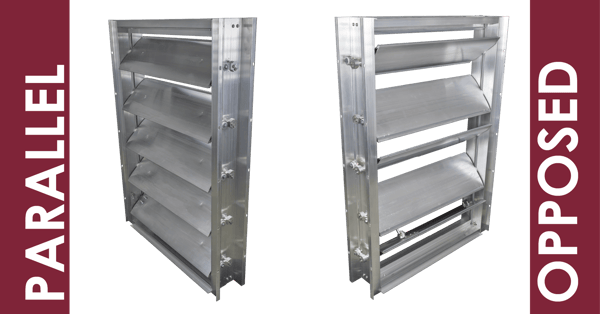
Damper blades can either rotate in the same direction or in opposite directions. Opposed orientation is known to have greater torque when closed, to prevent air leakage.
You will also need to consider the location of the damper's linkage. The linkage can be mounted onto the face of the damper or along the damper’s jambs. In-jamb linkage will be installed on the sides of the damper, known as the jambs. In-jamb linkage will not obstruct the damper’s air stream. However, if the damper is installed in a tight space, it will be difficult to access the linkage to make any necessary adjustments.
On-face linkage is installed on the blades and along the face side of the damper. This configuration is good for accessing the linkage, but it also means that the linkage will be in the air stream when the damper is open. Since it obstructs the air stream, on-face linkage can have a noticeable effect on your damper's air performance. However, you can easily test and maintain the linkage from the damper's face.
Consider where the damper will be installed when deciding on linkage location. Can you access the jambs from where the damper is installed, or will you need the linkage to be mounted on the damper's face? Choose the option that best matches the location of the damper.
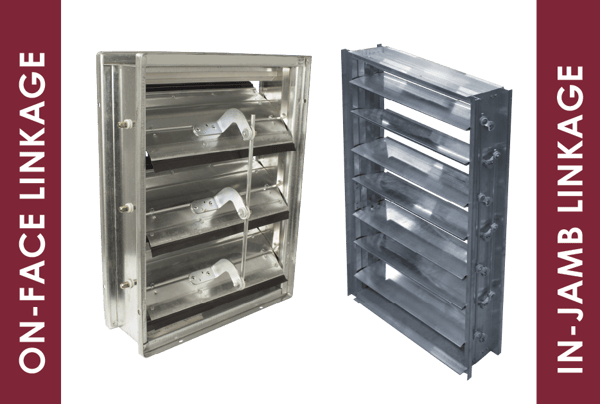
On-jamb linkage is easy to access but will obstruct the air stream when the damper is open. In-jamb linkage free up space but are more difficult to access.
Note: Backdraft dampers can be configured without linkage. For more information, read our article on backdraft dampers in the Newsstand.
Actuators - Electric, Pneumatic, and Manual
There are several options to consider when choosing an actuator for your control damper. First, choose which type of actuator to install: an electric motorized actuator, a pneumatic piston-style actuator, or a manual hand-operated actuator.
Read our Newsstand article on actuator types for a full breakdown of these options: Actuators - Making Adjustments.
To summarize the article, let's go over the three types of actuators:
- electric actuators utilize an electric motor to rotate the damper’s driving blade;
- pneumatic actuators are piston-based actuators tied to an air compression system, which rotate the driving blade to open or close the damper;
- manual actuators are hand quadrants, chain operators, or cable-driven operators that require a person to operate.

From left to right: An electric actuator, a manual actuator, and a pneumatic actuator.
Each actuator type will have advantages and disadvantages. Electric actuators are considered the best type for automating the damper’s open-close action. These actuators can be wired to receive commands from a centralized computer system, allowing the damper to open and close automatically. In a comparable way, pneumatic actuators can also be used to automate a damper’s open-close action by regulating the air compression system attached to the actuator.
Manual actuators cannot be automated. Someone must be present to control the damper’s open-close action. However, manual actuators are also the cheapest of the three options. They are cheap to purchase and easy to install.
Due to advances in technology, electric actuators have become a cheap option as well. However, there are other expenses to consider when deciding on actuators. Electric actuators will require an electrician to install the actuator and wire it to a power source.
Electric actuators are the longest lasting actuators, typically requiring only basic maintenance on a regular basis. These actuators are only replaced after a mechanical failure, which cannot be repaired in the field.
.jpg?width=420&height=288&name=Electric%20Actuator%20(Resize%2c%20HS).jpg)
An electric actuator mounted to a damper's driving axle. Standard electric actuators will rotate the blades to one of two positions: damper fully open and damper fully closed.
Electric actuators can also be configured to modulate the damper’s blade action. A typical actuator will only move between two actions, fully open and fully closed. Modulating actuators can move between more than two blade actions, such as open, half-open, and closed. Choose a modulating electric actuator if your damper needs to be partially open from time to time.
Pneumatic actuators are the best option for buildings with an air compression system already installed. Even though they are a cheap option, pneumatic actuators must be replaced on a regular basis.

Due to their design, a pneumatic actuator cannot be repaired without rebuilding the actuator or fully replacing it. Read more about pneumatic actuators with this Newsstand article.
For dampers in easy to reach places, consider a manual actuator to save the most money. Manual actuators will require maintenance, such as regular cleaning, but can be easily repair and replaced. Is the damper in an easy to access area?
Do you have someone ready to operate the actuator when needed? If not, consider a pneumatic or electric actuator for automating your dampers.
Blade Position - Position Indication Switches
When installing automated actuators, you may need a way to determine when the damper is opened or closed. It may seem as simple as opening the duct and examining the damper, but not when your system has dampers across a multi-story building.
Determining blade position is especially important when directing airflow from a centralized computer system. You need to know if your dampers are stuck to avoid severe damage to your HVAC system. This is where a position indication switch comes in.

Position indication switches, also called auxiliary switches, are devices that indicate the position of the damper's blades. These switches are typically integrated into the damper's actuator, but they can also be installed as a separate unit. Read more about position indication switches with our Condenser article, Open and Closed.
A position indication switch can be tied to the damper's driving axle alone or to the driving axle and the blade. The second option is considered the most accurate way to indicate blade position, since the switch is tied to both the driving axle rotation and to the blade's actual position. This can come in handy if the driving axle has been stripped and no longer rotates with the blade.
.jpg?width=600&height=400&name=DPI%20Switch%20(Resize%2c%20HS).jpg)
In this photo, we demonstrate a position indication switch tied to a damper's blade. The rod moves with the damper's blade rotation, which signals to the switch that the damper is open.
Most switches will indicate open or closed with lights, but certain units can also send signals to a remote system. This feature is especially useful when your dampers are tied to a central HVAC computer. You can also choose a position indication switch to indicate multiple blade positions, for modulating actuators. In this case, the unit will have multiple lights that indicate each intended blade position.
Position indication switches make troubleshooting and testing that much easier. Consider adding a position indication switch to your automated dampers.
Extensions - Jackshafts, Extended Shafts, and Extendable Shafts
You may decide to connect multiple dampers together into a single assembly. For these multi-panel assemblies, you can tie multiple dampers to a single actuator with a jackshaft or a shaft extension.
Jackshafts create a secondary axle attached to the driving blade on the back side of the damper. Once installed, you can operate the damper by rotating the jackshaft; regardless of whether the damper has on-face or in-jamb linkage.
Jackshafts can be connected between dampers, such that an actuator installed on one damper operates all connected dampers, if the actuator has adequate torque to operate multiple dampers at once.
Choose a jackshaft for dampers that works as part of a larger assembly.
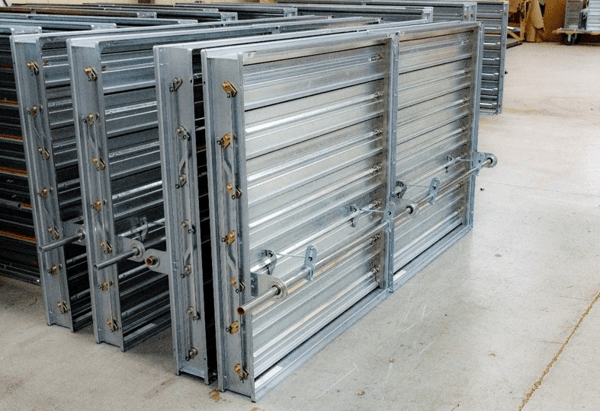
Pictured is a jackshaft connecting two dampers together. Both dampers will now open and close at the same time.
You can also choose to extend the damper’s driving axle with an extended or extendable shaft. These two options are similar in design and function the same way.
For a full explanation, read our Newsstand Condenser article on these two extension types: Extendables - Extensions for Damper Blade Shafts.
To put it simply, extended shafts are installed onto the existing blade axle while extendable shafts are integrated into the blade. In other words, an extended shaft goes over the damper’s driving blade axle and the extendable shaft is the driving blade axle.
Both accessories extend the drive axle past the damper's body, which allows the damper to synchronize with other dampers. Is there enough space for a full extended shaft? Or will you need to adjust the size for the damper to fit? Choose a shaft option that works best for your damper assembly.
You Have Options
Control dampers will play a key role in your HVAC system. You have options to make them work for you. Consider what you want the damper to do and choose options that help get the job done. Equip your dampers with the right accessories.
Which options would you use most often? What did you add to your last set of control dampers? Tell us in the Comments section. MCDLG wants to know!
For more on dampers, read these Newsstand articles:
Do you have a question on something we haven't covered here? MCDLG can help. Contact us by clicking on the button below.