.webp?width=91&height=70&name=MCDLG%20Logo%20(Resize).webp)
.webp)
In this article, we review the important numbers to consider when choosing a louver for air performance or weather protection.
Louver Design, A Game of Numbers
Louver selection is a game of numbers. You need to know how potential louvers will perform and whether they will provide enough airflow for your intended application. You should also understand how the louver will protect your ventilation opening from rainfall.
The key to choosing a louver is balancing protection with performance. The louver should protect from rainfall or severe weather, as required, while also maintaining the required amount of airflow. To strike this balance, you need to know your louver by the numbers.
Check out these Newsstand articles for more on louvers:
- Ten Important Traits of Highly Effective Louvers
- Four Questions on Louver Location
- Drainable Louvers for Rainy Days
The Numbers - Important Stats for Louvers
In this article, we will explain some data points involved in louver selection, why each is important to the louver’s application, and what to look for on the louver's submittal. We start our list with an important number for determining a louver's air performance.
Free Area (sq.ft. or %)
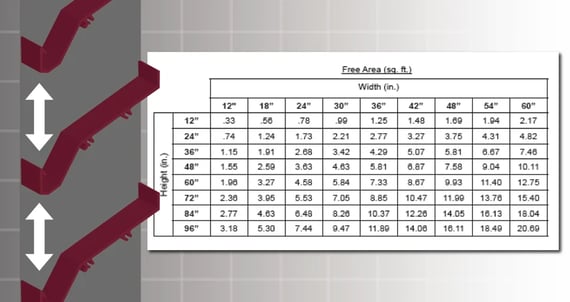
- What is it?: Free area is the free space between blades measured in square feet or square meters. For adjustable louvers, measure free area with the blades fully open. You can also express it as a percentage of the louver's total area.
- Ex. A 48" x 48" sample louver has 10.06 sq. ft. of free area or 63% free area.
- How does it work?: Higher free area means more space between louver blades. Free area will always increase with the size of the louver. Louvers with fewer blade features – such as straight non-drainable blades - will have more free area than blades with features.
- Why is it important?: Free area is important to figuring both the louver’s air performance and its ability to reject rainfall. More free area will translate to greater air performance.
- Where do you find it?: You can find the free area on a louver's submittal, along with other important performance metrics. Manufacturers like the louver’s total free area in a table by the louver’s width and height.
- Manufacturers calculate the total free area of each louver at various dimensions, up to the louver’s maximum dimensions.
Pressure Drop (in. w.g. at FPM)
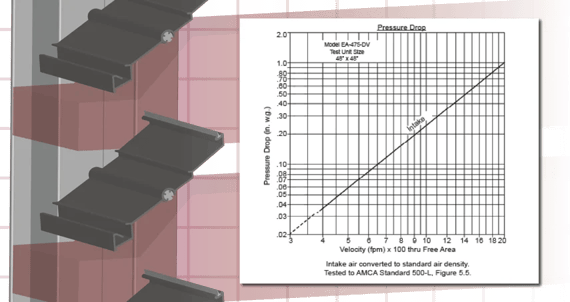
- What is it?: Pressure drop is the amount of pressure lost as air passes from the face of the louver to the ductwork behind it. This loss is measured in inches of water gauge at a given air velocity.
- Ex. A sample louver's pressure drop is 0.05 in. w.g. at 1000 FPM.
- How does it work?: As pressure drop increases, the airflow rate will decrease. The system can overcome this by increasing the speed of its fans. The system will consume more power to achieve the required airflow rate.
- Why is it important?: Pressure drop is important to the louver’s air performance. All louvers will cause some amount of pressure drop, but lower pressure drop will increase airflow. The HVAC system will use less power to draw in air.
- Where do you find it?: You can find the pressure drop on a louver's submittal. A straight-line graph shows pressure drop data with pressure drop (in. w.g.) along the Y axis and velocity through free area (FPM) along the X axis.
- Manufacturers test louvers according to AMCA Standard 500-L to determine the pressure drop at various air velocities. Louvers tested in this manner will display an AMCA seal for air performance on their submittals.
Learn how pressure drop affects airflow on the MCDLG Newsstand. We have several articles on efficient airflow.
Water Penetration (FPM)
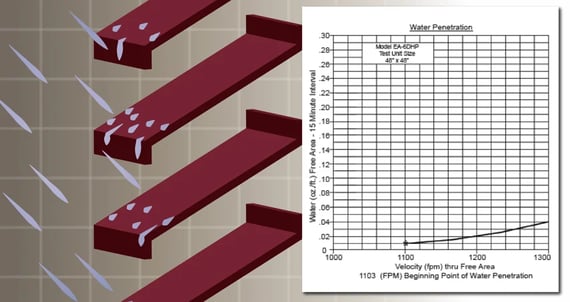
- What is it?: Water penetration refers to the amount of water that passes through the louver at a given air velocity. For selection, louver manufacturers will list the beginning point of water penetration.
- Ex. The beginning point of water penetration for a sample louver is 1103 FPM.
- How does it work?: The beginning point of water penetration is the point, in air velocity, when an excessive amount of water will infiltrate the louver. Manufacturers will list the beginning point of water penetration in FPM, or in metric as m/s.
- Note: AMCA testing limits the maximum beginning point to 1250 FPM. For details, read our article on Water Penetration testing.
- Ex. If a sample louver's beginning point of water penetration exceeds 1250 FPM, manufacturers will list it as "Above 1250 FPM".
- Why is it important?: The beginning point of water penetration is important for basic weather protection. A higher beginning point of water penetration will provide more protection.
- Where do you find it?: The louver’s submittal displays water penetration as a curved line graph. The amount of water infiltration through free area (in 15 minute intervals) will be on the Y axis and the velocity of airflow through free area will be on the X axis. Manufacturers will list the beginning point of water penetration near this graph in FPM.
- Manufacturers test louvers under AMCA Standard 500-L to determine their initial water penetration point. Louvers tested in this manner will display an AMCA seal for water penetration on their submittals. Read AMCA Testing - Water Penetration for more information.
Wind Driven Rain
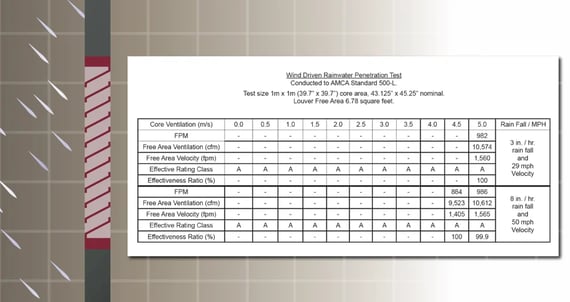
- What is it?: Wind driven rain refers to rainfall carried towards a louver by strong winds during a storm. Manufacturers categorize louvers designed for wind-driven rain as severe weather louvers.
- How does it work?: Wind driven rain data measures the amount of water that infiltrates a louver during a severe weather event. Severe weather louvers must block heavy rainfall driven towards the louver at high air velocities, while accepting the required volume of airflow.
- Why is it important?: Areas prone to severe weather will require louvers tested and rated for wind driven rain protection. This rating measures the water rejected and applies a letter grade to the louver.
- Where do you find it?: A table on the louver submittals will list wind-driven rain data, showing the percentage of test water the louver rejected and its corresponding letter grade.
- Manufacturers measure wind-driven rain data through testing under AMCA Standard 500-L. Technicians conduct tests at two simulated rainfall rates under specified wind velocities. Each test measures the amount of water rejected by the louver.
- Louvers tested in this way will receive a letter classification – Class A (100% - 99%) through Class D (Below 80%) – that signifies its effectiveness to reject wind driven rain.
- Class A is the best classification for wind driven rain, since the louver rejected 99 to 100 percent of simulated rainfall.
Face Velocity (FPM)
- What is it?: Face velocity is the speed of airflow as it passes through the face of the louver. Manufacturers will measure face velocity in feet per minute, or FPM. Metric measurements use meters per second (m/s) to measure face velocity.
- How does it work?: Face velocity increases as intake/exhaust air velocity increases. Increasing face velocity will also increase pressure drop.
- Why is it important?: Face velocity will help you determine the pressure drop of the louver and whether the louver will maintain its water penetration protection. Face velocity should never exceed the louver’s beginning point of water penetration.
- Where do you find it?: Your project’s specifications will list the louver’s required face velocity for its intended application.
Airflow Rate (CFM)
- What is it?: Airflow rate is the amount of airflow passing through the louver, measured as a volume. Manufacturers express this in cubic feet per minute, also called CFM. For metric measurements, use cubic meters per second (m³/s).
- How does it work?: More air will flow through the louver as the airflow rate increase. The louver should accommodate the airflow rate for its application.
- Why is it important?: HVAC systems require a certain amount of air circulating through the ductwork. Your louver should provide enough free area to allow the required volume of airflow.
- Where do you find it?: Review the specification documents for your project to determine the louver’s required airflow rate.
Air Leakage (CFM / sq.ft.)
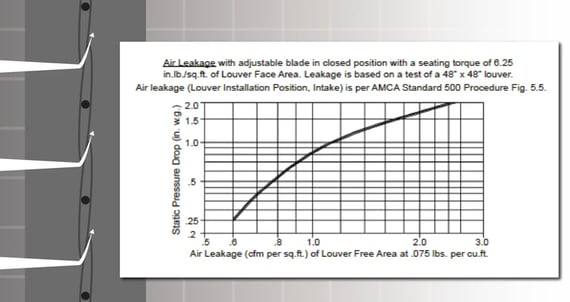
- What is it?: Air leakage is the amount of air that passes through a closed adjustable louver. We measure leakage as air volume per square foot of louver face area (cfm/sq.ft.).
- How does it work?: Air can leak through a closed louver, which makes it more difficult to achieve the required airflow rate. System fans will work harder to make up this difference.
- Why is it important?: Leaky adjustable louvers will affect air performance across the HVAC system. Leaks will require more power to maintain adequate airflow. learn more in "Air Leakage - The Performance Killer". Eliminate this inefficiency by choosing adjustable louvers with the least air leakage at the recommended size.
- Where do you find it?: The submittal will show a curved line graph of the louver’s air leakage, using pressure drop for the Y axis and air leakage for the X axis.
- AMCA Standard 500-L dictates the testing of adjustable louvers to determine their air leakage at various static pressure differentials, or pressure drops. Louvers tested in this manner will display an AMCA seal for air leakage on their submittals.
Applying the Numbers
Now that you know the numbers, you can apply them to your project! Below are three ways to calculate the necessary values to determine whether a louver will work for your project.
You will need the specification documents for your project and the submittal for the louver under consideration. These two documents will help you determine if a louver works for its intended application.
Learn about specifications documents on the Newsstand.
Finding the required total free area based on pressure drop
- Review the specifications for your project. These documents will provide the necessary airflow rate and the maximum allowable pressure drop for the louver.
- Find the pressure drop graph on the louver’s submittal. Use this graph to find the louver’s air velocity through free area at the maximum allowable pressure drop from the specification.
- Divide the necessary airflow rate (on the spec) by the louver’s air velocity through free area (on the submittal).
- The result will be the louver’s required total free area, or the total amount of free space between blades, head, and sill required to achieve the necessary airflow rate and velocity.
- Check the free area chart on the submittal. This chart will list the total free area of the louver at various widths and heights.
- Compare the required total free area calculated above with the sizes listed on the submittal's free area chart. The louver’s total free area should be greater than or equal to the required total free area at the desired width and height.
Finding the required total free area based on water penetration
- Review your specification documents to determine the required airflow rate for the louver.
- Find the water penetration graph on the louver’s submittal. This graph will display the louver’s beginning point of water penetration, expressed as velocity through free area.
- Consider a velocity through the free area that will be lower than the louver’s beginning point of water penetration. This will be the louver’s desired air velocity.
- Divide the volume of airflow by the desired air velocity. The result will be the louver’s required total free area.
- Check the free area chart on the submittal. Compare the required total free area you calculated above with the sizes listed on the chart. The louver’s total free area should be greater than or equal to the required total free area at the desired width and height.
Finding the required minimum free area based on air volume
- Locate the Water Penetration graph on the louver’s submittal. Use this graph to determine the louver’s beginning point of water penetration.
- Calculate an air velocity that is 80% of the louver’s beginning point of water penetration or less. You can also work with a baseline of 500 FPM, as an average. This will be your working air velocity.
- Review the project’s specifications to find the required airflow rate for the louver.
- Divide the required airflow rate by the working air velocity. This calculation will give you a minimum free area for the louver.
- You are determining the minimum free area required to achieve the required airflow rate without exceeding the louver’s beginning point of water penetration.
- Review the louver’s free area chart to find dimensions that provide a total free area close to the minimum free area you calculated above. Find the closest match to the calculated minimum free area.
All louvers should meet your project’s requirements first. Otherwise, the best louvers will be only fancy metal on your wall. Review your project's specifications when deciding on louvers. Your louvers should provide the airflow rate at the correct face velocity.
Once you meet the requirements, then you can begin looking for louvers that perform the best within their application: louvers that protect against severe weather, louvers that provide the most airflow, or a balance between the two. It all starts with knowing your louvers by the numbers!
Do you know your louvers by the numbers? Did you ever think that choosing louvers would require this much math? Let's talk about louver numbers in the Comments below. MCDLG wants to hear from you!
Need help right away? Contact MCDLG today. We are ready to help you.